Yafmp · chapters · 04 of 11
Playing music
Transport, volume, the queue and search in both editions of Yafmp.
Starting something
Everything you can play is a row in the library: a song, an album, a folder, a playlist, a station.
- On the Mac, double-click a song. On a touch screen, tap it. Playing a song from an album or folder puts the whole album or folder in the queue and starts at that song.
- Right-click a row (long-press on a touch screen) for a menu.
| Menu item | What it does |
|---|---|
| Play | Queues the folder or album and plays it from the start. |
| Shuffle | Queues it, switches shuffle on and starts at a random track. |
| Play from Here | On a song: queues its album or folder and starts at this song. |
| Add to Queue | Adds the tracks to the end of the queue without changing what plays. |
| Get Info | On artist, album and record label rows. See Properties and Get Info. |
Plugins add their own items to this menu, for example Fix Tags from MusicBrainz.
In the Apple edition, tracks that are already in the queue are reused, not added a second time.
On Android and desktop: Add to Queue is called Add to playlist, and Play from Here is Play from here.
Transport
| Control | What it does |
|---|---|
| Play / Pause | Starts or pauses. With nothing loaded, it starts the queue. |
| Stop | Stops and unloads the track. In the Apple edition it is in the Playback menu and on ⌘. |
| Previous, Next | Move through the queue. |
| Seek bar | Drag to move within the track. Elapsed time is on the left, time remaining on the right. |
| Shuffle | Plays the queue in random order. |
| Repeat | Cycles off → all → one. |
A live stream has no length. The seek bar is disabled and the time shows Live (LIVE on Android and desktop).
Seeking 10 seconds or one minute back and forward is on the keyboard. See Keyboard and commands.
Volume and mute
The volume slider sets Yafmp’s own volume, separate from the system volume.
- Apple: the slider is in the player bar on the Mac and under the transport on iPhone, iPad and Vision Pro. In a narrow Mac window it becomes a button that opens the slider. Mute is in the Playback menu (⌥⌘↓). It remembers the volume and puts it back.
- Android: tap the volume icon to mute or unmute. Long-press it to open the slider.
- Desktop: a mute button and a slider you drag, in the player bar.
Some outputs give apps no volume control. In the Apple edition the slider is dimmed while Apple Music plays or while you cast to a Chromecast. Use the device volume instead. On Android and desktop the volume control is hidden when the output has no volume.
The format line
Once a track opens, Yafmp shows what is actually playing: the codec, the sample rate, and the bit depth or bitrate where the source reports them. In the Apple edition it sits under the seek bar, between the two times. It is also the Format row of the Info panel in both editions.
The queue
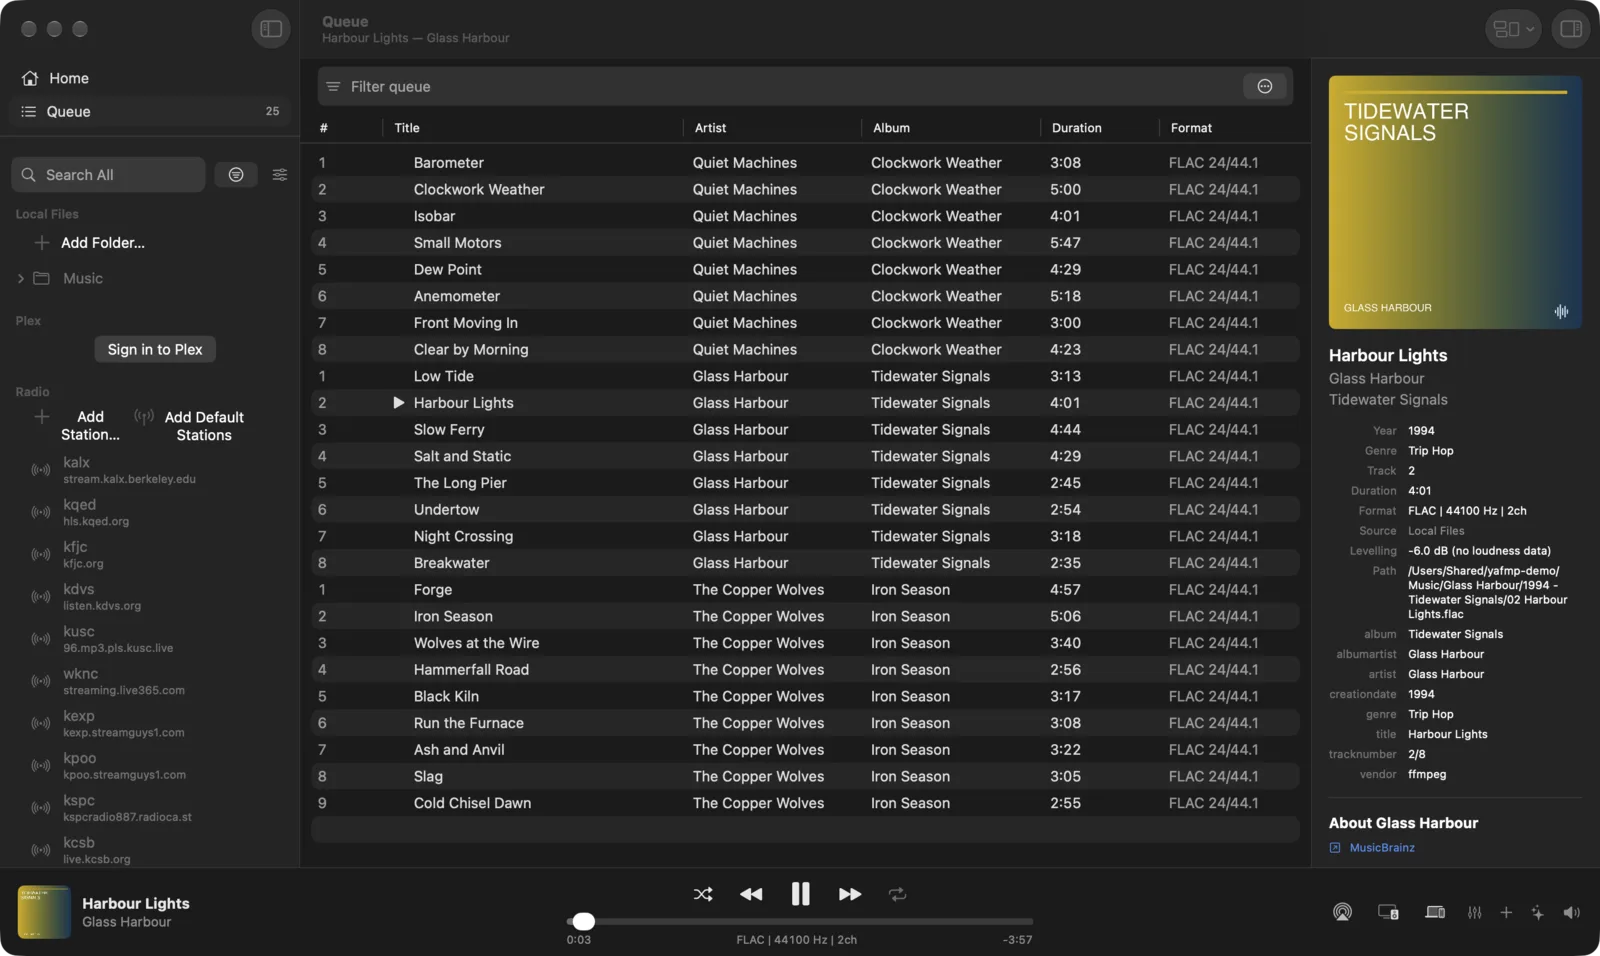
The queue is the list of what plays, in order. It is saved automatically. When you open Yafmp again the queue is back, with the last track and the position in it. The track is loaded paused. Press Play to continue from there.
Both editions store the queue in the same format, so a queue file from one edition opens in the other.
Open the queue with the Queue tab or sidebar row. Double-click a track (tap on a touch screen) to play it.
On Android and desktop some labels still say “playlist” where they mean the queue, for example Clear playlist.
Sorting and columns
This is in the Apple edition only.
- Click a column header to sort. The queue itself is re-sorted, so the play order follows and the new order is saved.
- Right-click the header to show, hide or reorder columns. Your choice is saved.
- On the iPhone, and on an iPad when the queue is narrow, the queue shows one row per track with no headers. A sort button beside the filter offers Title, Artist, Album and Year.
| Column | Shown at first |
|---|---|
| # | Yes |
| Title | Yes |
| Artist | Yes |
| Album | Yes |
| Duration | Yes |
| Format | Yes |
| Album Artist | No |
| Year | No |
| Genre | No |
| Bitrate | No |
| Source | No |
On Android and desktop the queue cannot be sorted and the columns are fixed. The desktop shows #, Title, Artist, Album, Time and Format. Android shows the track number, title, artist and album, duration and format in each row.
Filtering the queue
Type in the filter field above the queue (Filter queue on Apple, Filter on Android and desktop). The queue shows only the tracks whose title, artist, album or album artist contain every word you typed. Case and accents are ignored, so “sigur ros” finds “Sigur Rós”.
The filter only changes what you see. Playback still follows the whole queue.
Queue as albums
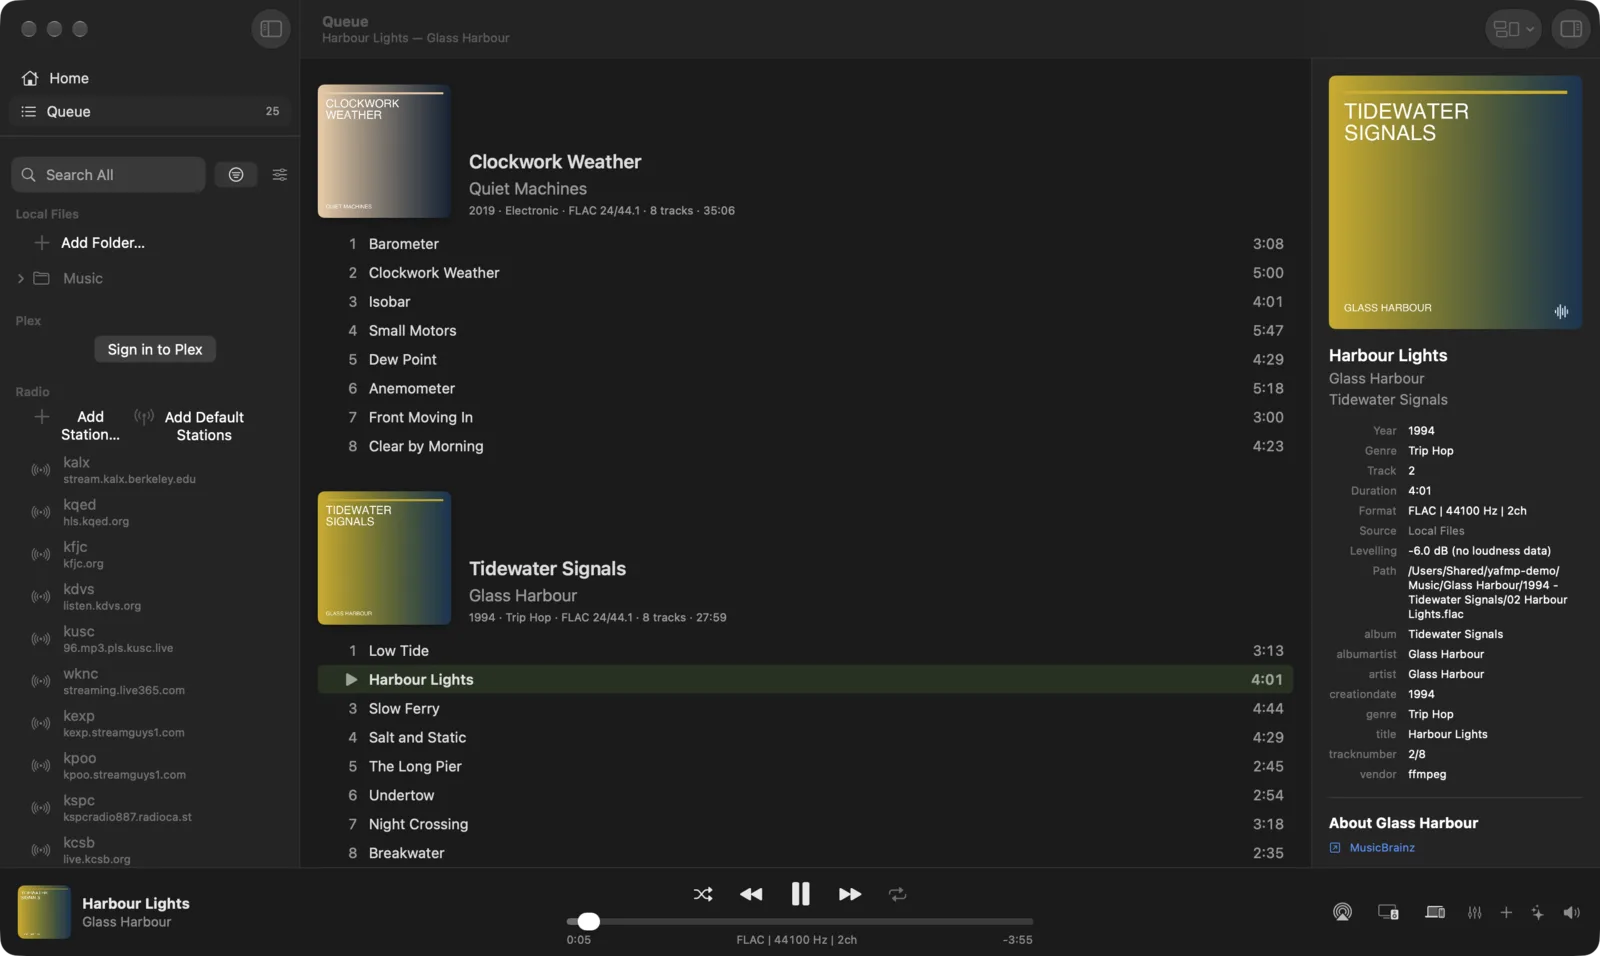
Queue as Albums shows the queue grouped by album instead of as a flat list. Tracks that follow each other and belong to the same album form one group under its cover.
- One song in the queue: a large cover with its tags.
- One album: an album page with the cover, artist, year, genre, format, track count and length.
- A mix: album after album.
Where to find it:
- Mac: the View button in the toolbar, or ⌥⌘A.
- iPhone, iPad, Vision Pro: the stacked-squares button at the top of the Queue page.
- Android and desktop: the album button beside the filter field.
Select, remove and clear
Apple: the ⋯ menu beside the filter field.
| Menu item | What it does |
|---|---|
| Select All | Selects every track the filter shows. |
| Remove Selected | Removes the selected tracks from the queue. |
| Save Queue as Playlist… | Exports the queue. See Exporting. |
| Clear Queue… | Removes every track, after asking. |
You can also right-click a track and choose Remove, or swipe a row left on the iPhone. Clear Queue is also ⇧⌘⌫, and that shortcut does not ask.
On Android and desktop:
- Open the ⋮ menu beside the filter field and choose Select, or long-press a track and choose Select.
- Tap the tracks you want. Select all in the bar at the top takes every track the filter shows.
- Choose Remove. Plugin actions such as Fix Tags from MusicBrainz are in the same bar.
- Tap ✕ to leave selection.
Clear playlist in the ⋮ menu removes every track and stops playback, after asking.
Properties and Get Info
Properties is about one track in the queue. Right-click it (long-press on Android) and choose Properties…. The Apple edition shows three groups: Tags (title, artist, album artist, album, disc, track, year, genre, duration, MusicBrainz album), File (format, sample rate, bit depth, bitrate, channels, size) and what the source knows, such as the file path or the server. On Android and desktop it is one list of the same kind of facts.
Get Info is about a library row: an artist, an album or a record label. Right-click the row (long-press on Android) and choose Get Info.
| Row | What Get Info shows |
|---|---|
| Artist | About the artist: picture, origin, the first paragraph from Wikipedia, links. |
| Album | Its release details and credits from Discogs, and About its artist. |
| Record label | About the label. |
About the artist and About the label come from MusicBrainz and Wikipedia. On the iPhone, Get Info is not in the menu of the Search tab’s rows. Open the row from Home and use its menu there.
Exporting the queue
- Apple: open the ⋯ menu and choose Save Queue as Playlist…. Android and desktop: open the ⋮ menu and choose Export .m3u8.
- Pick where to save. The suggested name is
yafmp queue.m3u8.
Local files are written with their paths, so other players can open the playlist. Tracks from other sources are written as a title line and a comment that names the source, artist, album and title. Stream addresses are never written out, because they can carry your sign-in.
Search
The search field is at the top of the library. Type and wait a moment, or press Return.
- Results open in the browser, grouped by source. Within a source they are headed Artists, Albums, Playlists, Folders, Songs and so on.
- On the iPhone there is no browser pane. Results replace the library tree on the Search tab.
- Each source searches in its own way. See the source’s page under providers.
Search scope. The filter button beside the search field chooses which sources are searched. The field shows the choice, for example “Search All” or “Search Plex”.
- Apple: tick any mix of sources, or All.
- Android and desktop: choose All or one source.
Sources you have hidden from the library are left out of searches.